Beauty Salon Member Booking and Shopping React Native Mobile Template
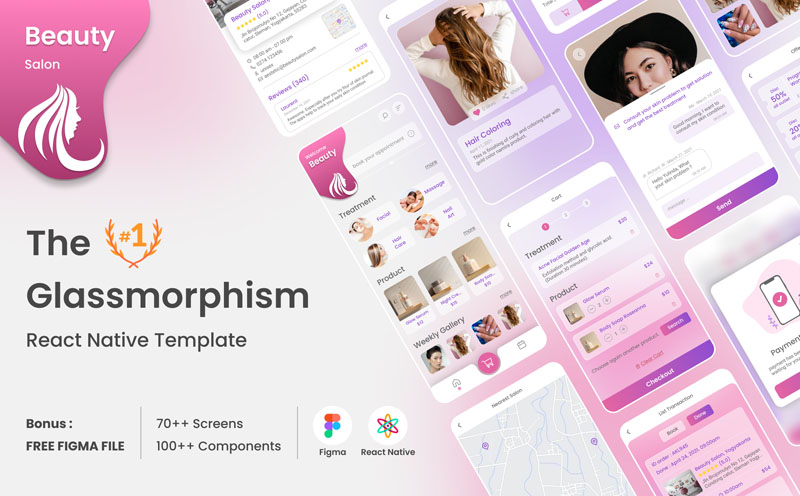
Beauty Salon Member Booking and Shopping React Native Mobile Template is a beauty Glassmorphism UI design that specially designed for the needs of women's salons.
This
template is develop with React Native and build with cleanly component
that will make easy to implement with your awesome code.
Created: Aug 17, 2021. Latest Update: Aug 17, 2021
Crafted with love by Otakita
Membership
- Personal info, can edit member personality like Profile Picture, Name, And Phone.
- Show member level and points
- Reset Password
News
- Show List and detail news of your business
Promotion Offers/Voucher
- Beauty voucher discount layout, that support percentage and nominal.
Branch Salon/Outlet
- Your loyal customer can see all of your salon branch, and can choose which location is closest to them.
- Integrate with Google Maps
- Customer Review and Rating
Skin Journal
- This is a Special Feature. With this feature, your business will support online consultation to your member.
- Member can see calendar of progress, and each day can upload selfie for consultation.
- Member can chat with they skin consultan.
Weekly Gallery
- This is how to yo show portofolio of your beauty. You can show the result after treatment in image or short video.
Notification
- Show notification about Reminder Reservation, Transaction Status, and Company Information.
Treatment and Product
- This template is support service and product.
- Product will have quantity for order.
Shopping Cart
- Template support e-commerce for buying a product or treatment.
- For treatment, your customer can select the date when they will come to your Salon.
- Customer can select branch of your salon and add voucher for discount.
- Multiple payment support like online payment and pay at store.
Transaction
- The transaction is devided into 2 parts, first is Book and second is Done. It can integrate with notification like reminder.
- Book status is for unfinished transactions. Customer can cancel the appointment at this moment.
- Done status is for finished transaction, canceled transaction or expired transaction.
Others
- Sign In Form with email and password.
- Forgot Password Form with PIN protection.
- Sign Up Form.
- Language option
- About Us
- F.A.Q.
Figma File for FREE!
- Yes, you read this. We provide figma files for free.
- We've created a clean figma file using components based that make you easy to modify to your wonderful project.
If you need instalation service, you can contact us with send email to [email protected].
Getting Started
This section will help you to build/run the React Native app.
Environment Setup
Windows:
-
Android
You will need Node, the React Native command line interface, a JDK, and Android Studio.
-
Node, JDK
We recommend installing Node via Chocolatey, a popular package manager for Windows. React Native also requires Java SE Development Kit (JDK), which can be installed using Chocolatey as well.
Open an Administrator Command Prompt (right click Command Prompt and select "Run as Administrator"), then run the following command:
choco install -y nodejs.install openjdk8Note: If you have already installed Node on your system, make sure it is Node 12 or newer. If you already have a JDK on your system, make sure it is version 8 or newer.
-
Android Development Environment
-
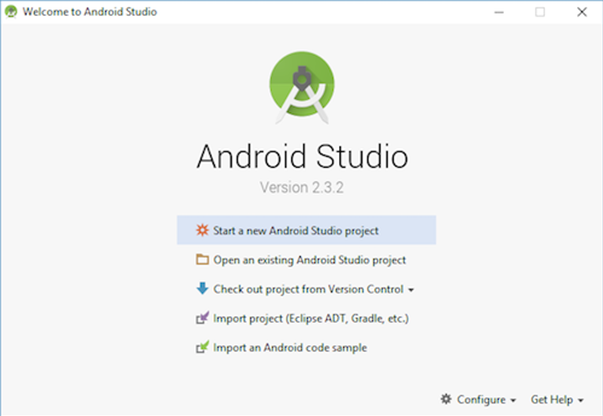
Install Android Studio
Download and install Android Studio. While on Android Studio installation wizard, make sure the boxes next to all of the following items are checked:
Android SDK, Android SDK Platform, Android Virtual Device. Then, click "Next" to install all of these components. -
Install the Android SDK
Additional Android SDKs can be installed through the SDK Manager in Android Studio. To do that, open Android Studio, click on "Configure" button and select "SDK Manager".
Make sure the following items are checked:
Android SDK Platform 30or newer,Intel x86 Atom_64 System ImageorGoogle APIs Intel x86 Atom System Image.Finally, click "Apply" to download and install the Android SDK and related build tools.
-
Configure the
ANDROID_HOMEenvironment variableThe React Native tools require some environment variables to be set up in order to build apps with native code.
- Open the Windows Control Panel.
- Click on User Accounts, then click User Accounts again
- Click on Change my environment variables
- Click on New... to create a new
ANDROID_HOMEuser variable that points to the path to your Android SDK:
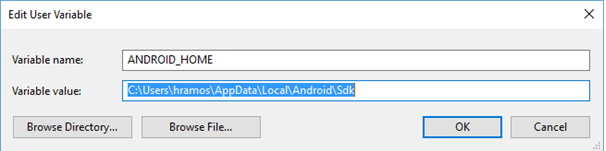
The SDK is installed, by default, at the following location:
%LOCALAPPDATA%\Android\Sdk -
Add platform-tools to Path
- Open the Windows Control Panel.
- Click on User Accounts, then click User Accounts again
- Click on Change my environment variables
- Select the Path variable.
- Click Edit.
- Click New and add the path to platform-tools to the list.
The default location for this folder is:
%LOCALAPPDATA%\Android\Sdk\platform-tools
-
Install Android Studio
-
React Native Command Line Interface
React Native has a built-in command line interface. Rather than install and manage a specific version of the CLI globally, we recommend you access the current version at runtime using
npx, which ships with Node.js. With npxreact-native <command>, the current stable version of the CLI will be downloaded and executed at the time the command is run.
-
Node, JDK
macOS:
-
Android
You will need Node, Watchman, the React Native command line interface, a JDK, and Android Studio.
-
Node and Watchman
We recommend installing Node and Watchman using Homebrew. Run the following commands in a Terminal after installing Homebrew:
brew install node
brew install watchman
Note: If you have already installed Node on your system, make sure it is Node 12 or newer.
-
Java Development Kit
We recommend installing JDK using Homebrew. Run the following commands in a Terminal after installing Homebrew:
brew install --cask adoptopenjdk/openjdk/adoptopenjdk8
Note: If you have already installed JDK on your system, make sure it is JDK 8 or newer.
-
Android Development Environment
-
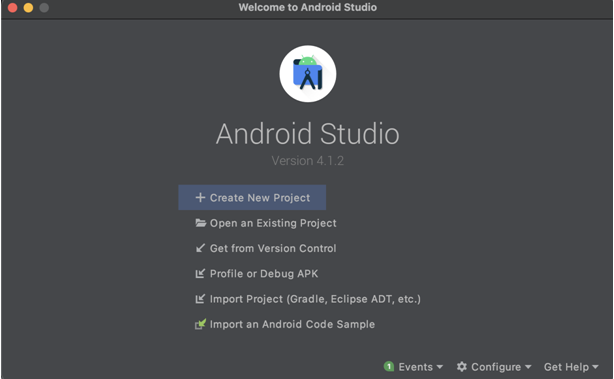
Install Android Studio
Download and install Android Studio. While on Android Studio installation wizard, make sure the boxes next to all of the following items are checked: Android SDK, Android SDK Platform, Android Virtual Device. Then, click "Next" to install all of these components.
-
Install the Android SDK
Additional Android SDKs can be installed through the SDK Manager in Android Studio. To do that, open Android Studio, click on "Configure" button and select "SDK Manager".
Make sure the following items are checked:
Android SDK Platform 30or newer,Intel x86 Atom_64 System ImageorGoogle APIs Intel x86 Atom System Image.Finally, click "Apply" to download and install the Android SDK and related build tools.
-
Configure the
ANDROID_HOMEenvironment variableThe React Native tools require some environment variables to be set up in order to build apps with native code.
Add the following lines to your
$HOME/.bash_profileor$HOME/.bashrc(if you are usingzshthen~/.zprofileor~/.zshrc) config file:export ANDROID_HOME=$HOME/Library/Android/sdkexport PATH=$PATH:$ANDROID_HOME/emulatorexport PATH=$PATH:$ANDROID_HOME/toolsexport PATH=$PATH:$ANDROID_HOME/tools/binexport PATH=$PATH:$ANDROID_HOME/platform-tools
-
Install Android Studio
-
React Native Command Line Interface
React Native has a built-in command line interface. Rather than install and manage a specific version of the CLI globally, we recommend you access the current version at runtime using
npx, which ships with Node.js. With npxreact-native <command>, the current stable version of the CLI will be downloaded and executed at the time the command is run.
-
Node and Watchman
-
iOS
You will need Node, Watchman, the React Native command line interface, Xcode and CocoaPods.
-
Node and Watchman
We recommend installing Node and Watchman using Homebrew. Run the following commands in a Terminal after installing Homebrew:
brew install node
brew install watchman
Note: If you have already installed Node on your system, make sure it is Node 12 or newer.
-
Xcode
The easiest way to install Xcode is via the Mac App Store. Installing Xcode will also install the iOS Simulator and all the necessary tools to build your iOS app.
Note: If you have already installed Xcode on your system, make sure it is version 10 or newer.
-
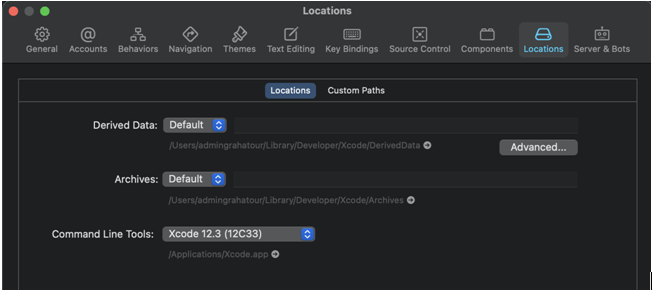
Command Line Tools
You will also need to install the Xcode Command Line Tools. Open Xcode, then choose "Preferences..." from the Xcode menu. Go to the Locations panel and install the tools by selecting the most recent version in the Command Line Tools dropdown.
-
Installing an iOS Simulator in Xcode
To install a simulator, open Xcode > Preferences... and select the Components tab. Select a simulator with the corresponding version of iOS you wish to use.
-
CocoaPods
CocoaPods is built with Ruby and it will be installable with the default Ruby available on macOS. You can use a Ruby Version manager, however we recommend that you use the standard Ruby available on macOS unless you know what you're doing.
Using the default Ruby install will require you to use sudo when installing gems. (This is only an issue for the duration of the gem installation, though.)
sudo gem install cocoapods
-
React Native Command Line Interface
React Native has a built-in command line interface. Rather than install and manage a specific version of the CLI globally, we recommend you access the current version at runtime using
npx, which ships with Node.js. With npxreact-native <command>, the current stable version of the CLI will be downloaded and executed at the time the command is run.
-
Node and Watchman
If you need instalation service, you can contact us with send email to [email protected].
Setup Your Files
After your system matches with the previous requirement, you are ready to build and run the template application.
Please follow this step:
- Unzip the downloaded file from the CodeCanyon: Beauty Salon-Member Booking and Shopping React Native Mobile Template. You will find beauty-salon project folder
- In terminal/command prompt window, please navigate to beauty-salon.
- Run the following command :
npm install
# or
# yarn install
- For Android, you need to clean the project android.
cd android
./gradlew clean
cd..
- For iOS, you need to link native dependencies. Note: Make sure you have installed CocoaPods. Run the commands below :
cd ios
pod install
cd..
- For Android, run following command in terminal and it will run on emulator or on your device if you have connected using USB.
npx react-native run-android
- For iOS, run following command in terminal and it will run on simulator or on your device if you have connected using USB.
npx react-native run-ios
android: In this folder all android app related folders and files are included. For generating an APK, you need to open this folder in android studio.- ios: In this folder all ios app related folders and files are included. For generating an IPA file, you need to open this folder in Xcode.
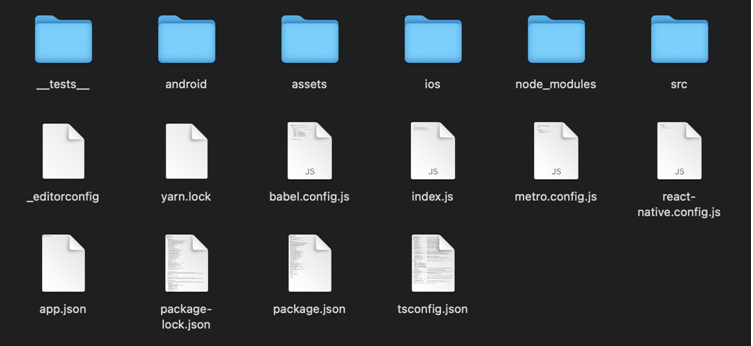
node_modules: All npm packages are located here. Once you run npm install or yarn install command, then all packages will be downloaded and include here.package.json: This file contains all packages details and its dependencies.src/components: This folder contains all components files which are used in pages.src/app: This folder contains all pages, models, navigation, actions, reducers, services, common, and main. Below is the structure of the folder.src/app/main: This folder contains all screens, navigation, Theme.tsx and App.tsx file.src/app/main/navigation: This folder contains RootNavigator.tsx, MainNavigator.tsx, TabNavigator.tsx, ModalNavigator.tsx, and RootNavigation.tsx, import RootNavigator.tsx file in App.tsx file.src/app/main/screens: This folder contains all screens files which are used in pages.src/app/main/App.tsx: This is the main file, it renders the root navigator (RootNavigator.tsx file).src/app/main/Theme.tsx: This file contains all constants code for attribute style like colors, spacing, borderRadius, textVariant, and breakpoints.src/app/pages: This folder contains all pages files.src/app/models: This folder contains all models files.src/app/services: This folder contains all services which are used for request API.src/app/actions: This folder contains all actions which are used for dispatch Redux.src/app/reducers: This folder contains all reducers which ared user for state management Redux.src/app/common: This folder contains Icons.ts, Fonts.ts, Utils.ts, Dummy.ts which used in the app.
Build APK
-
Generating Keystore
You can generate a private signing key using keytool
-
Windows
On Windows keytool must be run from
C:\Program Files\ Java\jdkx.x.x_x\binkeytool -genkeypair -v -storetype PKCS12 -keystore my-upload-key.keystore -alias my-key-alias -keyalg RSA -keysize 2048 -validity 10000
-
macOS
sudo keytool -genkey -v -keystore my-upload-key.keystore -alias my-key-alias -keyalg RSA -keysize 2048 -validity 10000
-
Windows
-
Setting up Gradle Variables
- Place the
my-upload-key.keystorefile under theandroid/appdirectory in your project folder. -
Edit the file
android/gradle.properties, and add the following (replace*****with the correct keystore password, alias and key password).MYAPP_UPLOAD_STORE_FILE=my-upload-key.keystore
MYAPP_UPLOAD_KEY_ALIAS=my-key-alias
MYAPP_UPLOAD_STORE_PASSWORD=*****
MYAPP_UPLOAD_KEY_PASSWORD=*****
- Place the
-
Adding signing config to your app's Gradle config
The last configuration step that needs to be done is to setup release builds to be signed using upload key. Edit the file
android/app/build.gradlein your project folder, and add the signing config....
android {
...
defaultConfig { ... }
signingConfigs {
release {
if (project.hasProperty('MYAPP_UPLOAD_STORE_FILE')) {
storeFile file(MYAPP_UPLOAD_STORE_FILE)
storePassword MYAPP_UPLOAD_STORE_PASSWORD
keyAlias MYAPP_UPLOAD_KEY_ALIAS
keyPassword MYAPP_UPLOAD_KEY_PASSWORD
}
}
}
buildTypes {
release {
...
signingConfig signingConfigs.release
}
}
} -
Generating the release APK or AAB
Run the following in a terminal:
											cd android

											./gradlew assembleRelease # apk

											# ./gradlew bundleRelease # aab
The generated APK can be found under
android/app/build/outputs/apk/release/app-release.apk
Build IPA
-
Building an .app Bundle
-
Run the following in a terminal:
													cd ios

													xed . # open application project with xcode
- Select your product's device target:
On a real device:Generic iOS DeviceorAny iOS Device (arm64).
On a simulator: Select any available simulator. - In the
Productmenu, selectClean Build Folder. - In the
Productmenu, selectBuild. - Navigate to your Xcode project's
Productsdirectory and find the generated.appfile.
-
-
Building an .ipa from an .app Bundle
- Create an empty directory with the name
BeautySalon. - Move the .app file inside the
BeautySalondirectory. - Compress the
BeautySalondirectory into an archive (.zip file) and give it a new name with .ipa appended to the end of the file name.
- Create an empty directory with the name
-
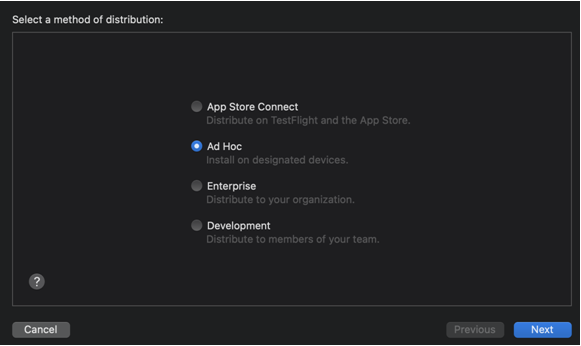
Building an .ipa File
You can use any of the existing methods of distribution for your iOS app, except for the
App Storetype. This means that you can choose any of the three other export methods:Ad Hoc,Enterprise, orDevelopment.- Open your app project in
Xcode. - Select
Generic iOSDevice orAny iOS Device (arm64)as your project's device target. - In the
Productmenu, selectClean BuildFolder. - In the
Productmenu, selectArchive. When the archiving process completes, you'll see your app listed under Archives. - Select your app and click
Distribute App. - When prompted for an Distribution method, select
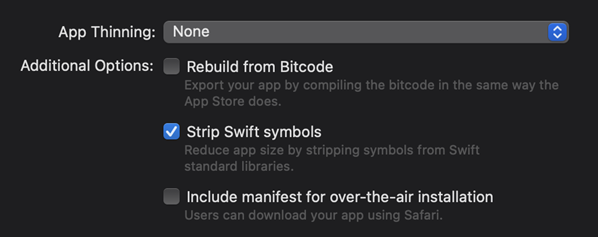
Ad Hoc,Enterprise, orDevelopment. - Set these
Distributionoptions: - Select your
Distribution CertificateandProvisioning Profile (Automatic or Manual). This will generate the .ipa file. - When the file generation process completes, click
Exportand choose where to save the .ipa file.
- Open your app project in
Only available when you buy this item.
Version 1.0 | Aug 19, 2021
[Release]: Initial release;
Plugin and Code
- Reanimated v2
- React Navigation v6
- React Native Gesture Handler
- React Native Redash
- React Native Blur
- Shopify Restyle
- React Native Svg
- React Native Camera
- React Native Video
- React Native Maps
- React Native Linear Gradient
- React Native Modal
- React Native Bottom Sheet
- React Native Drop Shadow
- React Native Get Location
- Redux
- React Redux
- Redux Thunk
- Redux Persist
- Async Storage
- Moment JS
- Date Fns
- Lodash
- Axios
Free Template Web